High Availability Architecture in AWS with AWS-CLI

The article creates a High Availability Architecture in Amazon Web Services. The article performs practical using the aws-cli. If you are new to aws-cli, check out this article, this will get you started with the AWS Command Line Interface.
The article covers creating a basic-web site hosted on AWS. The website will be created on an EC2 instance. The static files will be served using S3 and CloudFront. The web pages will be store in an EBS volume for easy migration and snapshots. The practical is performed on a free tier account and services from the free tier.
Steps to be followed to create the architecture:
- Create an EC2 instance
- Create EBS volume
- Getting the Volume ready to store data
- Creating an S3 bucket
- Uploading the objects to the S3 bucket
- Creating a CloudFront Distribution
- Installing Apache HTTPD
- Mounting EBS on WebServer DocumentRoot
- Creating an HTML template
- Starting the WebServer
- Visiting the WebSite
Create EC2 instance
In order to create a server, we need a Machine. Let’s create an EC2 instance using CLI. Make sure that you have correctly configured your aws-cli with the proper working region. The following command creates a t2.micro instance with the Amazon Linux 2 AMI.
$ sudo aws ec2 run-instances --image-id ami-08f63db601b82ff5f --instance-type t2.micro --subnet-id subnet-d20d04ba --security-group-ids sg-036cbf64 --key-name arth_practice_acc
{
    "Groups": [],
    "Instances": [
        {
            "AmiLaunchIndex": 0,
            "ImageId": "ami-08f63db601b82ff5f",
            "InstanceId": "i-0f3d7e0daaa793f98",
            "InstanceType": "t2.micro",
            "KeyName": "arth_practice_acc",
            "LaunchTime": "2021-01-03T07:17:11+00:00",
            "Monitoring": {
                "State": "disabled"
            },
            "Placement": {
                "AvailabilityZone": "ap-south-1a",
                "GroupName": "",
                "Tenancy": "default"
            },
            "PrivateDnsName": "ip-172-31-35-144.ap-south-1.compute.internal",
            "PrivateIpAddress": "172.31.35.144",
            "ProductCodes": [],
            "PublicDnsName": "",
            "State": {
                "Code": 0,
                "Name": "pending"
            },
            "StateTransitionReason": "",
            "SubnetId": "subnet-d20d04ba",
..
..
Once the instance is created, get it’s instance-id. We will require it in going further.
Create an EBS Volume
Next, we will create an EBS volume. We will store all the web pages on this volume. This EBS volume is persistent as it won't be deleted even if the server is terminated or gets crashed due to any reasons. Also, we could mount it on another instance and start the services from that instance quickly. This would make the website highly durable on an AWS EC2 machine. The following command creates an EBS Volume with 1 GB of Storage in the Mumbai-1a subnet.
$ sudo aws ec2 create-volume \
> --size 1 \
> --availability-zone ap-south-1a
{
    "AvailabilityZone": "ap-south-1a",
    "CreateTime": "2021-01-03T07:26:00+00:00",
    "Encrypted": false,
    "Size": 1,
    "SnapshotId": "",
    "State": "creating",
    "VolumeId": "vol-042db8ddd87e0744b",
    "Iops": 100,
    "Tags": [],
    "VolumeType": "gp2",
    "MultiAttachEnabled": false
}
After the EBS is created, we need to attach it to the EC2 instance we created earlier. To perform the attaching of EBS use the following command. The basic arguments required to perform attachment are the device name, the id of the instance to attach to, and the id of the volume created in the above step.
aws ec2 attach-volume --device /dev/sdv --instance-id i-0f3d7e0daaa793f98 --volume-id vol-042db8ddd87e0744b
{
"AttachTime": "2021-01-03T07:30:57.734000+00:00",
"Device": "/dev/sdv",
"InstanceId": "i-0f3d7e0daaa793f98",
"State": "attaching",
"VolumeId": "vol-042db8ddd87e0744b"
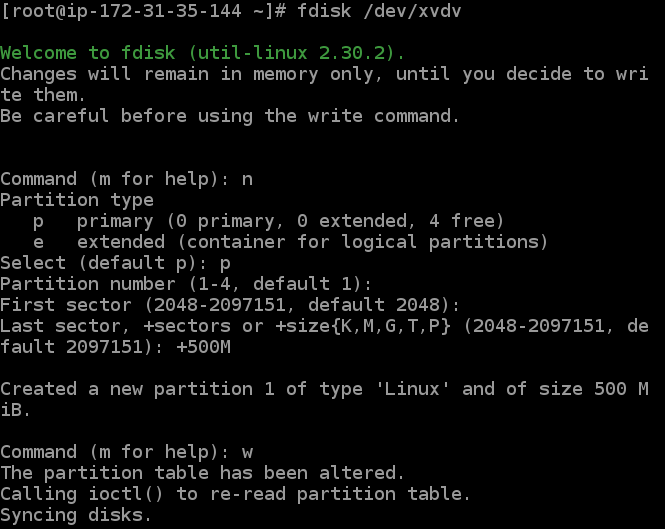
}Getting the Volume ready to Store data
Once, the volume is attached, connect to the instance using either ssh or the CLI in the browser. Note that, only Amazon Linux 2 has the facility of using the CLI via a browser. We need to create a partition in the volume in order to use it. The following commands create a partition of 500M and format it with the ext4 file system.

Create an S3 Bucket
Our website contains static files like images. We will be uploading those to an S3 bucket. The S3 in Amazon S3 stands for Simple Storage Service. As the name implies it is a web service provided by Amazon Web Services which provides storage for the internet. This storage is highly-scalable and secure in the cloud. The following command creates a bucket in the Mumbai region. Regions outside of us-east-1 require the appropriate LocationConstraint to be specified in order to create the bucket in the desired region.
$ aws s3api create-bucket --bucket mistryp998clibuck  --create-bucket-configuration LocationConstraint=ap-south-1
{
    "Location": "http://mistryp998clibuck.s3.amazonaws.com/"
}
Upload files to the S3 Bucket
The following command uploads all the objects from a Local Directory to the S3 Bucket. I have stored all the images to upload in the directory. We also have to make the uploaded objects publicly readable.
$ aws s3 cp  ~/files_to_upload_to_s3/  s3://mistryp998clibuck/  --recursive  --acl public-read
upload: files_to_upload_to_s3/ebs.png to s3://mistryp998clibuck/ebs.png
upload: files_to_upload_to_s3/ec2.png to s3://mistryp998clibuck/ec2.png
upload: files_to_upload_to_s3/s3.png to s3://mistryp998clibuck/s3.png
upload: files_to_upload_to_s3/cf.png to s3://mistryp998clibuck/cf.png
Creating a CloudFront Distribution
Amazon CloudFront is a fast content delivery network (CDN) service that securely delivers data, videos, applications, and APIs to customers globally with low latency, high transfer speeds, all within a developer-friendly environment. The following command creates a CloudFront distribution for our above-created S3 bucket. The elemental arguments required to create a CloudFront distribution is just the S3 bucket name.
$ aws cloudfront create-distribution \
>               --origin-domain-name mistryp998clibuck.s3.amazonaws.com
{
    "Location": "https://cloudfront.amazonaws.com/2020-05-31/distribution/E290RJLQ6WF9DB",
    "ETag": "E15E4KZQ278Y59",
    "Distribution": {
        "Id": "E290RJLQ6WF9DB",
        "ARN": "arn:aws:cloudfront::007496165739:distribution/E290RJLQ6WF9DB",
        "Status": "InProgress",
        "LastModifiedTime": "2021-01-03T12:44:12.976000+00:00",
        "InProgressInvalidationBatches": 0,
        "DomainName": "d27qi2q4egyngh.cloudfront.net",
        "ActiveTrustedSigners": {
            "Enabled": false,
            "Quantity": 0
        },
        "ActiveTrustedKeyGroups": {
            "Enabled": false,
            "Quantity": 0
        },
        "DistributionConfig": {
            "CallerReference": "cli-1609677851-260516",
            "Aliases": {
                "Quantity": 0
            },
            "DefaultRootObject": "",
            "Origins": {
                "Quantity": 1,
                "Items": [
                    {
                        "Id": "mistryp998clibuck.s3.amazonaws.com-1609677851-893925",
                        "DomainName": "mistryp998clibuck.s3.amazonaws.com",
The images could be accessible from the url http://{cloud_front_domain}/{object_name.ext} once uploaded to the bucket.
Install Apache httpd
Once all the static files are in place, we need a Web, Sever. We would be using the Apache Httpd software. Connect to your instance and install the apache httpd software on it. We would be using the Apache Httpd software.
# yum install httpd Loaded plugins: extras_suggestions, langpacks, priorities, update-motd amzn2-core                                                                                         | 3.7 kB  00:00:00      Resolving Dependencies --> Running transaction check ---> Package httpd.x86_64 0:2.4.46-1.amzn2 will be installed
..
..
..Verifying  : generic-logos-httpd-18.0.0-4.amzn2.noarch  8/9Verifying  : httpd-2.4.46-1.amzn2.x86_64                9/9Installed:httpd.x86_64 0:2.4.46-1.amzn2Dependency Installed:apr.x86_64 0:1.6.3-5.amzn2.0.2                                    apr-util.x86_64 0:1.6.1-5.amzn2.0.2apr-util-bdb.x86_64 0:1.6.1-5.amzn2.0.2                         generic-logos-httpd.noarch 0:18.0.0-4.amzn2httpd-filesystem.noarch 0:2.4.46-1.amzn2                        httpd-tools.x86_64 0:2.4.46-1.amzn2mailcap.noarch 0:2.1.41-2.amzn2                            mod_http2.x86_64 0:1.15.14-2.amzn2Complete!
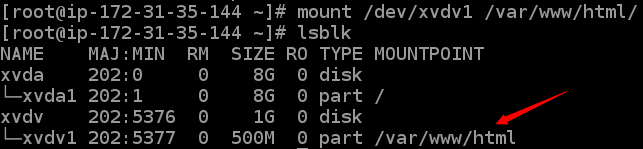
Mounting the EBS on WebServer DocumentRoot
Let’s mount our 500M partition on the /var/www/html directory.
Creating the template
Next, we create a webpage index.html that will render our images.

# cat /var/www/html/index.html
<html> <h1> Creating a high availablity zone using EC2 EBS S3 and CloudFront </h1>  <img src='http://d27qi2q4egyngh.cloudfront.net/ec2.png' alt='Image not found' > </img> <img src='http://d27qi2q4egyngh.cloudfront.net/ebs.png' alt='Image not found' > </img> <img src='http://d27qi2q4egyngh.cloudfront.net/s3.png' alt='Image not found' > </img> <img src='http://d27qi2q4egyngh.cloudfront.net/cf.png' alt='Image not found' > </img> </html>
Starting the WebServer
# systemctl start httpdchecking the status
# systemctl status httpd
    ● httpd.service - The Apache HTTP Server
Loaded: loaded (/usr/lib/systemd/system/httpd.service; enabled; vendor preset: disabled)
Active: active (running) since Sun 2021-01-03 12:33:45 UTC; 3h 37min ago
Docs: man:httpd.service(8)  Main PID: 2866 (httpd)
Status: "Total requests: 74; Idle/Busy workers 100/0;Requests/sec: 0.00567; Bytes served/sec:   6 B/sec"
CGroup: /system.slice/httpd.service                                  ├─2866  /usr/sbin/httpd -DFOREGROUND                                        ├─2891 /usr/sbin/httpd -DFOREGROUND
Visiting the WebSite
Let’s now visit our website:

This concludes the creating of a basic High Availability Architecture on AWS. Thank you!